
Touch Sensor Physics Investigatory Project PDF Class 12
PDF Download Link Given Below
To Get the Link Scroll Down to end of this Page
INTRODUCTION
Touch sensor has been common nowadays for displays and IoT projects with Arduino. They can be found in lamps, touch screens of smartphones, and other wide arrays of applications as well. However, do you understand the working principle of a touch sensor and how to make a simple touch sensor?
What is touch sensor?
A touch sensor is an electronic sensor used in detecting and recording physical touch. Also known as tactile sensors, it’s a small, simple, low-cost sensor made to replace old mechanical switches we seen in the past.
WORKING PRINCIPAL
The Touch Sensor is sensitive to touch, pressure as well as force. The Touch Sensor works similar to that of a simple switch.
When there is contact or a touch on the surface of the Touch Sensor. It acts like a closed switch and allows the current to flow through it. When the contact is released it acts similar to the opened switch and hence there is no flow of current.
APPLICATION OF TOUCH SENSOR
As mentioned in introduction, a touch sensor is used for a wide array of applications, with those being:
- Touch sensor in robotics, a touch sensor is commonly used in robots, enabling basic movement and the ability to detect touch in its surroundings (E.g. When the robot runs into something, the touch sensor can have it to stop moving)
- Smartphones, automotive, industrial applications
- Touch sensor faucet in kitchens; allowing for control of running water without having to physically turn the knob
- Touch sensor switches are used in place of physical press switch
- Most other applications that require pressure/distance measurement
TYPES OF TOUCH SENSOR
As per their functions, the Touch Sensors are classified into two types which are used in different circumstances and utilities.
- Capacitive touch sensor
- Resistive touch sensor
Capacitive Touch Sensor
A Capacitive touch sensor measures touch based on electrical disturbance from a change in capacitance. It consists of an electrode film on top of the glass panel that’s conductively coated with a printed circuit pattern around the outer viewing area.
How capacitive touch sensor work:
- The user applies touch on the glass panel
- The printed circuit panel around the outer viewing area of the glass panel creates an electrical charge across the surface
- It results in a decrease in capacitance and allows the system to determine the touchpoint.
- Multiple touchpoints can be detected as well, allowing for touch pinch and spread
Capacitive touch sensor applications:
- Portable devices such as smartphones and tablets (iPhones, iPad, etc.)
- Home applications such as touch lamps
- Automotive
- Industrial
Advantages of a capacitive touch sensor:
- Doesn’t require pressure to be applied since
it’s built on the glass itself, hence making force insignificant to sensing requirements - Support for multi-touch
- High responsiveness
Disadvantages of a capacitive touch sensor:
- Vulnerable to abrasion
- Reliability concerns when used in harsh environments
- Doesn’t work with gloves or stylus
Resistive touch sensor
Resistive touch sensor measures touch through responding to the pressure applied to their surface. It consists of two conductive layers and a non-conductive separator. Unlike the capacitive touch sensors, it’s not multi-touch compatible. And also, these sensors can’t sense the small contact or touch. Resistive Touch Sensor requires an amount force to operate.
How resistive touch sensor work:
- The user applies pressure against the surface
- The outside conductive layer is then pressed against the inner layer, resulting in voltage changes
- The voltage changes are then compared to the starting voltage, allowing for the point at which the touch took place to be calculated
Resistive touch sensor applications:
- Musical instruments, touchpads, etc.
- Older music players, game consoles, etc.
- Office equipment
Advantages of a resistive touch sensor:
- Cost-effective and durable to be used in harsh environments
- Able to be used with stylus and gloves
- Less complex
- Low power consumption
Disadvantages of a resistive touch sensor:
- The inability for multi-touch technology unlike the capacitive touch sensors
- Dependent on pressure, require more pressure to be applied for sensing to take place
MAKING OF TOUCH SENSOR
Hopefully! You are quite familiar with the things like What is touch sensor, Types of touch sensor, It’s application in real life etc
Now it’s time to make it practical, So you can make a simple working model of touch sensor by following below steps.
MATERIAL REQUIRED
- Cardboard
- 9V Battery
- Battery Clip
- 3V LED
- 1K Ω Resistor
- BC547 Transistor
- 6-12V Buzzer
- Connecting Wire
- Metal pin
PROCEDURE
- First of all, draw below circuit diagram on cardboard
- Now fix all the components at their respectie places as shown in circuit diagram
- And then connect the wire across the components with help of circuit diagram
- Now Connect the battery and your model is ready to test
OBSERVATION
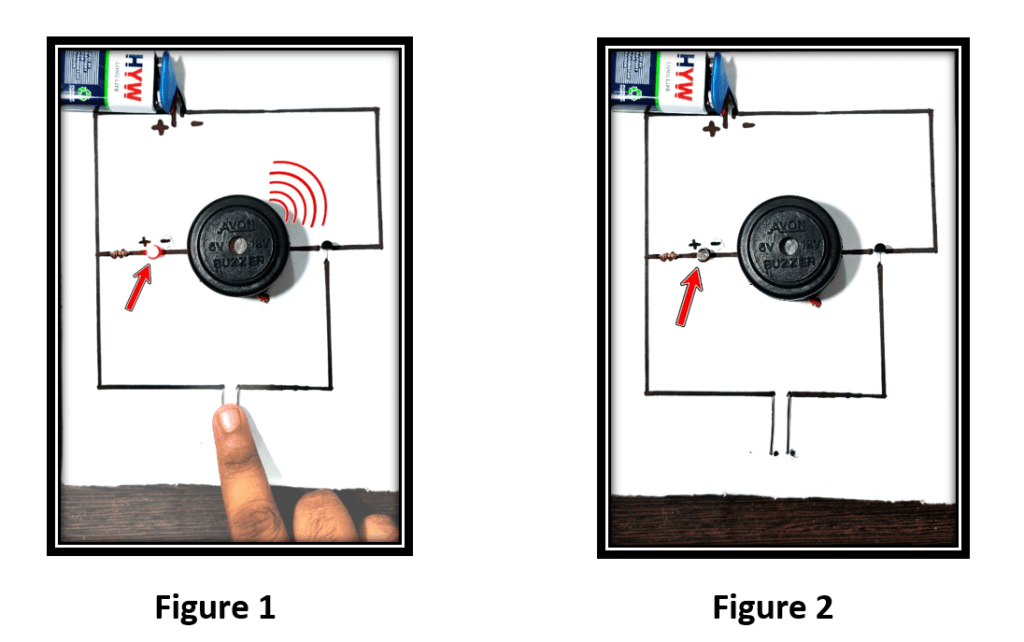
When we place finger on both touch sensor (Metal pin), LED and Buzzer gets ON
When we place finger on both pins, due to high resistance of our body very low positive current signal passes through base of transistor and the transistor gets ON or it acted as close circuit.
As shown in figure 1.
When we remove finger from both touch sensor
(Metal pin), LED and Buzzer gets OFF
When we remove finger from both touch sensor (Metal Pins) no current passes to base and due to zero signal in base, transistor gets OFF or acted as open circuit. As shown in figure 2
PRECAUTION
- All the connection should be neat and tight.
- Connect the transistor in correct way considering its Collector, Base and Emitter.
- Be careful while connecting LED and Buzzer as they have to connect with correct polarity
- Don’t Avoid using Resistor because it protects LED from high power
- This model does not work with very dry hand so make sure your hand is little bit moist
- Do not use any insulated/coated metal pin as touch sensor
- Remove the battery from after testing your working model